
There are 3 components that successful remote classes have in common: collaboration, interaction, and communication. Read on to learn more!
4 Challenges in Remote Teaching for Teaching Fellows
After got its hit in the just past spring semester, remote teaching in higher education is continuing to be the main solution for education for the rest of this year, and even with a chance to become an important part of the future education. Challenges are never fading in this quick transition process, but we also got the solutions as it goes. As many workshop addressed the needs for faculty members and college students, this blog post is going to focus on the top four challenges and its solutions for teaching fellows in remote teaching.
1. Technology
Many teaching assistants and teaching fellows mentioned the challenge of using technology in their remote teaching, which includes but not limited to LMS, Zoom (especially the Breakout rooms function), grading system that provided by the university, Kaltura, H5P, Respondus, Google Assignments, Matlab, TurnitIn, and etc. A sample list of technology related questions that being asked most by TAs in my institute are:
My grading cannot be synced in the gradebook; I had trouble of viewing the videos lectures in my/faculty’s course site; I had issue of creating a TA site for my course site; Log-in issue for Zoom account; Kicked out of back-to-back meetings; I cannot view students’ submissions in Google Assignments; etc.
Solution/Suggestion
For Learning Management System (LMS)
It is really important to get familiar with the LMS prior to remote teaching. As a teaching fellow, once you find out the teaching task, the first thing is to find out the LMS and relative resources that your school is providing. Most universities and colleges have a LMS center that offers workshop and tech-support regarding to teaching and learning in the LMS. Please try to find and contact the unit on your campus.
In addition to find local support, the most used LMSs among higher education also provides great tutorials:
- Canvas LMS community offers both video and text tutorials,
- MoodleDoc provides tutorials on topics such as manage a course, manage a site, and add activities, etc.,
- Blackboard instructor help includes quick start, feature guide, and many other topics.
For using Zoom to lecture/lead online discussion sessions
If you are also using Zoom as the main remote teaching lecturing tool, please check Zoom Help Center, which includes great text and video tutorials. A few zoom help pages that my TAs used quite often are:
- Breakout rooms: https://support.zoom.us/hc/en-us/articles/206476093-Enabling-breakout-rooms
- Screen sharing: https://support.zoom.us/hc/en-us/articles/201362153-Sharing-your-screen-in-a-meeting
- Change meeting settings: https://support.zoom.us/hc/en-us/articles/115005756143-Changing-your-meeting-settings
For a specific tool
Similar to LMS, local support usually performs the role in providing tech-support on a specific tool. Even with a same tool, the function and features may vary with institutions. So, after you know the teaching task, it is good to communicate with the course designer or the faculty member to find out if there is any specific tool used and then know the contact for local support.
2. Time Management
Do you have any concern about the working load? Will remote teaching add more works to you? After bringing everything “online” and deliver lecturing remotely with such a short notice, the working load becomes a headache for many teaching fellows. You might need to perform extra roles than teaching, such as managing content in a course site, monitoring online discussion while also leading live discussions, and some might be even lucky to get a new but empty TA site. Below are some suggestions that you might want to plan ahead to avoid a disaster in time management after class begins.
Solution/Suggestion
First, if possible, I could encourage each teaching fellow to start a conversation with the faculty member prior to the actual teaching, even the teaching fellow is to teach “independently”. The conversation will help you to figure out the course logistics and the individual and shared responsibilities. Sample responsibilities include:
- develop any teaching content,
- add developed content to a course site,
- build course site
- convey information from instructor to students, such as weekly announcements
- lead a discussion section (synchronously)
- manage discussion forums (asynchronously)
- grading
Second, find a method that you prefer to track and categorize the time spending. A spreadsheet is usually one of the most popular and easiest time management tool that allows customization and record how much time has been spent on what tasks. Depend on the conversation with the faculty members, you would want to record the time (hours) you spend on:
- teaching planning
- course site building
- live discussion session
- office hours, etc.
Third, if you need to collaborate with other teaching fellows on the same course, make sure discuss how the split of responsibilities would look like. If you are going to have the same responsibilities, it is still helpful to set regular check-in meetings to share challenges and solutions with each other.
Other time management tools and techniques that you may want to check:
- Time management techniques
- 3 Steps to Effective Time Management
- Principles for Effective Time Management for Balance, Well-being, and Success
3. Communication
Communication in remote classrooms can be tricky. One question that I want to challenge teaching fellows is how do you define communication. In an ecosystem of learning community, communication involves both instructor and students, what to communicate and how to achieve the information exchange in a effective way, which is weigh more than simply of sharing an article or emailing.
Solution/Suggestion
One suggestion for effective communication with remote students is to make sure you are familiar with the options within a LMS. For instance, most LMS has announcement that allows broadcasting messages to the whole class with just one click. In-box within a LMS is another option that allows group and individual communication within one course. Some LMSs also has instant message or chat function that allows anyone from the same class to send instant messages to each other, as long as you are “online”, which is quite similar to chatting on social media.
Communication also involves feedback loop; if that is something you usually do in a F2F class, you can achieve the same goal online, probably with more flexibility. For instance, you can provide instant and efficient feedback to students’ submissions, in a format of text, audio, video, or a combination; you can send regular check-in emails (weekly or bi-weekly) to the whole class; you can set up reference FAQs to guidance students on similar questions; you can establish online office hours to guarantee the time space for students.
The remote teaching situation is not just a challenge for instructors, students are also wondering how they should perform in a remote classroom. So, the third suggestion for teaching fellows to prepare your remote classroom would be about regulating students’ behavior during remote teaching, which would be good for facilitating a healthy and equal remote classroom.
- Establish student-TA expectations
- Establish student code of conduct, and share with students from the very beginning
- Be a role model for your students
Some teaching fellows mentioned that they received requests from students to work during weekends. Although remote teaching and learning could be 24/7, but that does not mean you have to be “on call” during weekends. So, what contact information you want to share with students is important. Consider including the following on the syllabus and in the course site:
- Name,
- Pronouns,
- Email (and response expectation),
- Office Hours,
- zoom/synchronous Meetings if any, and
- a short biography
4. Engaging students
How to engage students might be one of the biggest challenges of remote teaching. Many teaching fellows were struggling with this “how”. The lack of face-to-face connection seems to be the “culprit” that causes the failure of engaging students in remote classrooms. But, is it so? I believe if you cannot engage learners F2F, you won’t achieve the goal online either. The problem is not what you can or cannot do online, but how to make that transition and adjustment (or even be creative). One question that has been asked a lot during my recent consultations is
I usually join my students’ group discussions in class and provide feedback. How to do so online?
A quick answer would be it could be different engagement formats (like you cannot physically show-up), but it does not mean you “cannot” join the discussion with students remotely (breakout rooms).
Solution/Suggestion
If you also use Zoom to deliver the remote classroom, the Tips and Tricks for Teachers Educating on Zoom is a good reading to start with. Besides, I summarized the four approached that have been tried and proved to be effective by many faculty members,
- Plan to use Zoom breakout rooms with structures, such as how many groups, how many students per group, what group activities per session, etc.
- Adjust your teaching style to reflect different learning needs (audio, visual, or kinesthetic)
- When zooming, supporting dissenting opinions, and encouraging civil discourse.
- Survey your students to know what works well and what could be improved
Besides Zoom, is there other ways that I can engage my students?
Design different icebreaker games using discussion boards or other tools regularly to start a sense of community and also keep track of ongoing or weekly discussions. Ideally, you will summarize questions and challenges for the instructor on a regular basis. Many teaching fellows also try to establish a friendly tone for the first week by sharing their own interest, self pictures, favorite food, etc., to gain the empathy with students. To check some good remote icebreaker strategies and tools:
- Padlet: an online space that allow students to share about themselves, know each other, and make it fun to contribute to.
- 10 Fun Virtual Icebreakers to Take Remote Working to the Next Level
- 10 EdTech Tools for Encouraging Classroom Collaboration
How to Host Office Hours on Zoom
In the light of global outbreak of COVID-19, schools might be closed and teaching activities might be interrupted, which is actually already happened in China and some school districts in the U.S. As more considerations of moving face-to-face teaching to online arisen in this emergency scenario, Zoom, one of the video conferencing technology, provides the continuity. Following the four steps below, you can easily host your normal office hours online.


3 Ways to Retain Online Learners
This article was originally published at eLearning Industry: https://elearningindustry.com/retain-online-learners-3-ways
Online education is booming, enrollment is increasing, but attrition is growing as well. As an Instructional Designer, how can you provide an engaging learning environment to let online learners truly enjoy their learning experience and stay? Here are some methods.
According to Babson Survey Research Group’s 2016 “Online Report Card: Tracking Online Education in the United States” [1], the number of learners taking online courses grew to 5.8 million nationally in 2016. That is to say one in four learners enrolled in online courses, and this number keeps going up [2].
While making lots of efforts to bring more programs online, institutions are also fighting hard with the high rate of attrition to improve online learners retention. Being the architect of an online course, an Instructional Designer can contribute using their Instructional Design magic to create an engaging learning environment for online learners to enjoy learning and expect more online education opportunities. Here are 3 ways Instructional Designers can help retain online learners.
1. Establish A Learning Community That Allows Learners To Develop Their Professional Network
According to the U.S. Bureau of Labor Statistics and Yale University report in 2016, 70% of all jobs are found through networking. An online course could be a perfect place for learners to start building own profession network that will benefit their career growth. With some design idea, it can easily turn the online course into a small learning community for learners to know each other, interact with peers, and grow a professional network.
Start With Opportunities Of Knowing Peers
A learning community begins with self-introduction. Using a discussion board to create a place for learners to share some information of themselves, using something like a background, helps them see the connection with this course, the expectations of the learning journey, etc. The instructor can also include light instructions to clarify the discussion board purpose and guide the communication. For instance, the instructor posts a self-introduction as an example, he/she selects a few questions (formal or informal) to help students start. Moreover, it is helpful to encourage students to include a picture or a video of their self-introduction, as this creates the opportunity to visually “see” peers in an online class, making the whole experience a real thing.
Virtual/Office Hours Between Instructor And Students
One reason for online learners quitting their study is the feeling of frustration that may be caused by not receiving timely support. When learners need help in the learning journey, they need instructors to be around. If an instructor could commit a “fixed” supporting time for online learners, that would dramatically decrease such “frustration” and it would definitely encourage learners to continue their learning. Virtual (in case of not having a location office)/office hours will give learners the opportunity to share their concerns of learning and ask any questions. It could be through an LMS or Skype and it could happen either once or even twice a week. In this way, students would not “panic” when seeking help during learning.
For instructors who traves a lot, think about a possible plan of meeting online students in real life. Check the course Programming for Everybody that offered by Dr. Charles (Chunk) Severance on Coursera. The instructor posts his national, or even international, office hours and locations regularly through the course for local students to see and schedule a meeting online or a discussion face to face.
Collaboration Opportunities For Students
In a learning community, learners can also learn from peers and support each other. When designing an online course, activities that allow collaboration, such as group projects, group discussions, group presentations, etc. provide the opportunities for learners to grow together. When working collaboratively, learners have the sense of active participation and can take up their responsibility, which not only develops learners’ critical thinking ability but also allows them to establish their professional network which will later benefit their career in the long run.
2. Provide Early Feedback To Learners, As Early As Possible
Studies show that more questions are asked at the beginning of a course than towards the end. In online course design, early intervention will help students to be clear about the going-to-be learning journey.
Early Feedback On Learners’ Performance
Once a learning journey starts, learners need guidance to be on track even in a self-paced course; so as early as possible, feedback to learners is necessary. Activities, such as discussions, quizzes, or learning module reflections could all be integrated as early as in the first week of an online course. By providing feedback to learners’ activity performance as early as possible, provides the instructor with the ability to make any necessary adjustments in order to retain online learners.
A Mechanism That Allows Learners To Reflect
Introducing a mechanism that allows learners to reflect their learning can help learners recognize the meaning of learning, as well as examine the connection between content and their learning needs. Creating such a mechanism as learning starts is strongly recommended. Activities such as module reflections, discussions on the lecture topics, and essay questions help learners explore their learning behind presented content. Once the connection between learners and the course is built, it would be hard to separate learners from their learning journey, and as a result, decrease the attrition.
3. Support Online Learners In A Timely Manner
In addition to designing a virtual space at the beginning of a course for students to introduce each other and ask questions whenever they need it, sufficient information can also be included throughout the course, such as details of technical support (LMS, a LTI, any external educational tool adopted), information of hotline/helpdesk, email contacts, and expectation of responses in order to support learners. Those miscellaneous items might not be the main part of learning, but it’s a sure thing that learning can’t happen smoothly without them. So, be prepared to include that information in your online course so as to provide comprehensive support for your online learners’ success.
To sum up, the loneliness and frustration learners may feel during learning can easily destroy online learners’ journey. To eliminate the loneliness and minimize the frustration, a learning community should serve learners with better experiences, through which online learners will feel welcome as soon as they enter the course. Providing learners with more opportunities to communicate and learn from each other is also of major importance. Through careful design, learners will be parts of a learning community that not only helps them to grow in terms of acquiring knowledge but also establishes a professional network that will benefit them for future careers.
References:
[1] Online Report Card – Tracking Online Education in the United States, 2015 (https://onlinelearningconsortium.org/read/online-report-card-tracking-online-education-united-states-2015/)
[2] One in Four Students Enrolled in Online Courses (https://onlinelearningconsortium.org/news_item/report-one-four-students-enrolled-online-courses/)

5 Things You Need to Prepare to Become an Instructional Designer
With a transition from “an emphasis on skills development and knowledge acquisition to a focus on personal construction of meaning and user experience”, the field of instructional design has experience shift over the last several decades (See Instructional Design Timeline), so does the responsibilities of instructional designer.
People’s curiosity of instructional designer as a job have shifted from “what is an instructional designer” to “how to become an instructional designer”, which triggers lots of discussions of how to become an instructional designer and what are the skills an instructional designer should have.
Years of experience from my instructional designer career in higher education provides me a few hints in providing quality instructional design services, which might be something you want to consider if planning to work with a qualified instructional designer or looking for a career path in instructional design.
1. Knowledge of Instructional Design Models and Learning Theories
Instructional design is a process rather than a teaching practice; it has an entrance to start and an exit point to end or re-start a development. A properly selected instructional design model sets the direction. As summarized in Educational Technology’ s post of Instructional Design and Theories, the models provide “guidelines to organize appropriate pedagogical scenarios to achieve instructional goals”.
Similar to architecture (not surprised to see the title “instructional architect” for an instructional designer), instructional designer builds a learning environment based upon instructional design models which is the blueprint that will guide and direct how the construction starts. A qualified instructional designer should have the ability to customize the blueprint to fit all relative instructional activities (syllabus, course structure, schedule, teaching, assessment, etc.) into it, not by only knowing the models names, but with the ability to customize all the phases and stages of those models to best serve the entire instructional process.
A degree in or related instructional design can bring you sufficient knowledge of the models and learning theories, includes definitions of instructional design models, the functions of different models, best practices in selection of best-fit model, evaluation of models, etc. If you did not have a related degree but wanted to have a career switch, always start with the basic one (e.g. ADDIE model) to get familiar with the process, and then move forward with in-depth exploration of different instructional design models. (Want a peek-o-boo of those models? Please read my other posts of Instructional Design Models).
2. Experiences With Educational Technologies
An interesting career path phenomenon is that instructional technologist is usually differentiated from instructional designer by requiring more handy experiences in producing educational technology products and less knowledge of instructional design process. In some job descriptions, it even make a clear statement that Instructional designer has a focus on design (planning and creating materials) to provide knowledge to learners, while instructional technologist mainly works with technology (tools or technologies) to aid learning.
Due to the above distinguish, it was really surprised to know that lots of instructional designers that have never (or with very limited experiences) worked with a learning technology directly, such as screen-capturing tools or e-Learning software. When referencing to a need of media creation, those instructional designers usually turn to instructional technologists for help in designing and creating the learning objects (such as videos, e-Learning activities, multimedia, etc.). Such gap limits instructional designer in providing full and quality services to clients, and prevents instructional technologist from receiving straightforward instructional goals of an learning object, at least to certain extent.
Although an instructional designer cannot be an “all-rounder” and should focus on process and procedures, experiences in creating learning technology products will a strong support in offering accurate recommendations, strategies and consultations to clients. Only with hands-on experiences of educational technologies (at least knowledge of how the tools function and ability in creating some samples), an instructional designer can provide quality and effective instructional design services.
Here is a short list of most commonly used educational technologies in instructional design beyond text processing software and LMSs,
- Screen capturing tools: Camtasia, Screencast-O-Matic
- e-Learning authoring tools: Adobe Captivate, Articulate 360/Storyline 360
- Multimedia tools: Adobe Creative Cloud (Photoshop, Premier, After Effect)
- E-Portfolio tools: Google Site, Pathbrite, Wix
3. Awareness of Copyright
When working with Subject Matter Experts (SMEs), instructional designer (ID) will receive tons of instructional materials; and ID is also the source person for SMEs to search for proper resources that without copyright issues. I have been asked lots of but similar questions from instructors from different disciplinary, such as,
- “Can I use this picture in my PowerPoint slides?”
- “I have hundreds of pictures used in my slides, but did not remember where I got them, will it be an issue?“
- “Do I have to add the original source link to this image in my video lecture?“
- “Do I have to cite all documents fully in my presentation?“
- “Can I get some loyalty free pictures or/and videos?”
- “This document is from my colleague (and he knew), do I need to give credit in my lecture?“
Not all SMEs have been trained in a research-based academic environment (saying the knowledge of citation format and fair use), so it is the instructional designer’s reasonability to review those materials, prepare answers to questions above, and make sure resources and materials are under compliance, which is especially important in distance and online education.
Through the entire instructional design process, you should always keep copyright and other compliance if any in mind. A good instructional designer should always convey the information of copyright with SMEs prior to design, and try to work with SMEs to produce original/reusable content. If budget allows, purchase stock images would save time and energy.
If there is a copyright concern, try to use materials from Creative Commons and OER resources. Some websites provide high-quality loyalty free images, audios, and videos, such as Pexels, Pixabay. Also, lots of articles of copyright in instructional design would provide you up-to-date information of how to deal with copyright questions when working with clients; here are a few if you may want to check:
- Intellectual Property in Instructional Design (Video & Image)
- Copyright Law for instructional designers
- Protect your e-Learning work
4. Consideration of Universal Design for Learning (UDL) and Accessibility
As more emphasis has been given on student-centered learning and active learning, it is important for instructional designer to apply principles of UDL and accessibility into the process. When producing learning materials and activities, take different learning styles into consideration, and create various learning opportunities that fit individual learning need. For detailed information of Universal Design for Learning (UDL), check here.
In online education, accessibility is especially important. Aspects to consider include alt-text for image, closed caption and downloadable transcription for audio and video, hyperlink, correct heading style in documents, etc. (Also check the post of accessibility design from IHE: 5 Tips for ADA-Compliant Inclusive Design).
5. Ability in Conducting Research
More and more instructional design related jobs add the requirement of ability in “conducting research” nowadays than ever before. It believes that the ability in conducing research will keep an instructional designer be sensitive in exploring the best learning solutions and leading education with innovative initiatives. With instructional designer’s research skills, you will be able to answer questions like what would be the possibility of integrating VR into education, how do learners learn best, how to retain online learners through instructional design, etc.
In a sum, with the knowledge of instructional design models and learning theories, you have a guideline of the entire process and know exactly where to start; with ability in both design and utilization of technologies, you have more freedom of turning brilliant ideas into reality; with awareness and consideration of copyright and accessibility, you provide a learning environment that is at ease and justified; with continuous research in related fields, you can not only stay on the cutting edge of instructional design, but also innovate yourself as a leader in your own field.
References
https://www.instructionaldesigncentral.com/instructional-design-history
The Instructional Design Model That Best Fits – SAM Model
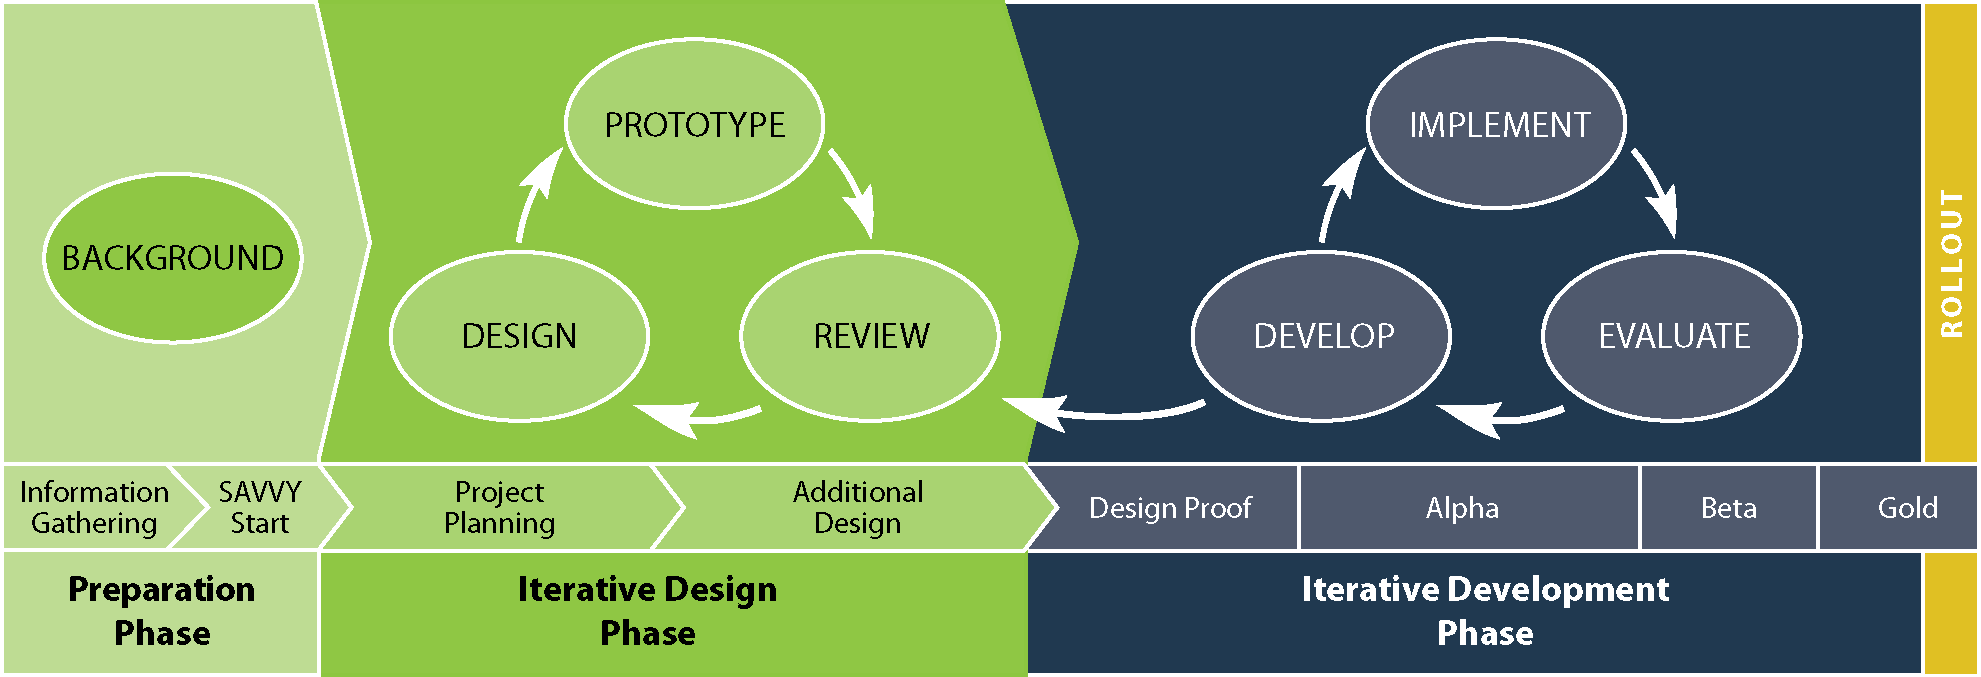
SAM is the acronym of Successive Approximation Model that has been introduced by Allen Interactions as an “alternative to ADDIE that also emphasizes collaboration, efficiency and repetition”.
SAM Model: A Model with Agile Advantage
SAM model is agile and iterative. “Agile” means multiple steps are happening at the same time; and those smaller and flexible steps contribute in achieving high quality in training and learning. “Iterative” means each development stage in SAM is cycled, and each cycle should be closer to ideal than the last one. The iteration makes room for evaluation and changes to the development as needed.
SAM model also requires a close collaboration between all parties, such instructional designer, program manager, facilitators/and clients, which ensures the best development of each course and training. If there is anything got alert, instant feedback will trigger the evaluation so that course development can be changed quickly.
Three Phases of SAM:
There are three phases or development stages of SAM, and each is cycled to be closer to ideal.
Preparation phase
SAM starts with the preparation phase, but not the same preparation as in ADDIE or ASSURE. The preparation and information gathering in SAM is quick. SAVVY Start means the development focus is to ensure an alignment between the learners performance needs and the learning solution.
In this preparation phase, all parties should be involved (instructional design, facilitator, program manager, stakeholder, etc.) and start a collaborative brainstorm session to establish the project foundation, which usually is in the formats of meetings.
Iterative design phase
In this phase, the cyclical model with three iterations of design, prototype, and review is quite similar to other instructional design models such as ADDIE and ASSURE, which involves the steps of design, development, and evaluation. All parties’ ideas and assumptions are discussed, prototyped, and evaluated early on approaching an usable product.
Iterative development phase
In this iterative development phase, led by instructional design, all parties work collaboratively to go through the development, implementation, and evaluation together. The four steps of this phase starts with a design proof which derived from the first iteration development, move to Alpha (a complete version of the instructional application), then evolve into Beta (a version after feedback in Alpha step), and finalize into Gold (a version after feedback in Beta step).
Instructional designers and others will continually analyze and evaluate throughout the process. At any point if a change needs to occur, it can happen quickly to limit any risk of moving out of budget or time, which allows a much higher flexibility in utilization of resources during development.
SAM Model: An Agile Development for Badge Courses
A badge course, different from credit course, focuses on delivery of learning outcome that represents skills and knowledge gained through short training. Badge course learners usually are required to complete course/training within limited time-frame, and with the expectation that the obtained learning could be applied into needs quickly.
Because of its emphasis on repeated small steps and iterations, and its all intentions to address some of the most common instructional design pain points, like meeting timelines, staying on budget, and collaborating with Subject Matter Experts (SMEs), SAM model has its unique value in supporting the development of digital badge course/training and non-credit program which encourages performance-driven learning and usually delivers content to a wider range of audience through limited time-frame.
Scenario:
The Office of Extension at University ABC is developing its first online badge program of XYZ. An Instructional Designer will work with program manager and course facilitator/client to start the development using SAM model.
Development of a badge course through SAM
 Step 1. Preparation with Savvy Start
In the preparation phase, program manager initiates a kickoff meeting to share information with instructional designer and facilitator(s)/client. Instructional design gathers all the background information that includes the following, but not limited to, which helps to narrow focus on the requirements of the client,
- The course/program objectives
- The number of courses of the program
- Original timeline of completion
- What resources are already available
- What resources need to be produced
- Whether assessment is necessary; and what types of assessment could be provided
- Who will be the facilitators and their time commitment to the development
- Any training needed on the instruction side
Savvy Start in this phase is more a solution to brainstorm design ideas; all parties share and discuss information to generate initial design ideas and possibilities.
 Step 2. Iterative design phase
Then it comes to the iterative design phase. Throughout the Savvy Start (from the preparation phase) and this iterative design phase, the whole team, including instructional designer, program manager, and facilitator/client, will be rotating through design, prototype, and review.
Within the design phase, project planning deals with assessing project development details that could affect the timeline and budget, and involves considerations about the communication, risk, schedule, scope, and resources implications. For instance,
- communication methods. How the instructional designer to communicate with facilitator/client after kick-off meeting, via phone, email, or in-person?
- availability of services and resources. What resources and services would be provided for client, such as video filming, software availability, equipment check-out policy, etc.
- additional expenses. Who will be responsible for the expenses during development?
Additional design is available in this phase if necessary, which means the instructional design considers the complete content to understand the different varieties of instructional treatment, such as video lecture or interactive activity. Meanwhile, the iteration of design enables client to suggest changes and adjustment, such as replacement of content, or alternatives to original instructional treatment.
The cycle of design, prototype, and review of ideas will be rotated until a solution that be closest to ideal.
 Step 3. Iterative development phase
The iterative development starts in this phase. Working with information and materials received, the Instructional Designer demonstrate a visual and functional version of the course, which might still be samples of components, but with more functional and usable details than the prototype. For instance, the client would like to produce a interactive game to facilitate self-learning path in this badge course, the instructional design creates a draft version based upon the prototype from storyboard; then share the draft with client for feedback, which then moves to the Alpha step.
Alpha, Beta, and Gold are different versions of courses based upon each other. Lots of communication, idea exchange, feedback, adjustment, and even re-building are necessary in this iterative development phase. With SAM model’s agile advantage, adjustment and change could be determined and completed in a timely manner. Once the gold version is approved, it would be the conclusion of the course development.
References:
- An Introduction to SAM for Instructional Designers. https://community.articulate.com/articles/an-introduction-to-sam-for-instructional-designers
- Instructional Design Models in E-Learning. https://www.slideshare.net/CommLab/instructional-design-model-in-elearning
- Iterative eLearning Development with SAM. https://www.alleninteractions.com/sam-process
- So Who is SAM? https://www.fka.com/so-who-is-sam/
- Successive Approximation Model (SAM). https://trainingindustry.com/glossary/successive-approximation-model-sam/?utm_content=cpdc
The Instructional Design Models That Best Fit – ASSURE Model
The ultimate goal of instructional design is to make effort to build a course or training that inspires both instructor and learners with unique and valuable teaching and learning experience. However, because there is not a “perfect” design forever, it is always necessary to improve an existing instructional design product by any possibilities.
Similar to the ADDIE model based development, the enhancement of a course, especially with technology and media integration, needs guidance; and ASSURE model is the one that works best for course and training enhancement and improvement.
ASSURE model: An “I am not sure” model
In the era of technology prevalence, one big concern for instructors when planning in improving teaching and learning is how to integrate technology into education. When presented a dazzling list of technologies and medias as solutions, most instructors might have the same reaction: technologies are awesome, but “I am not sure”.
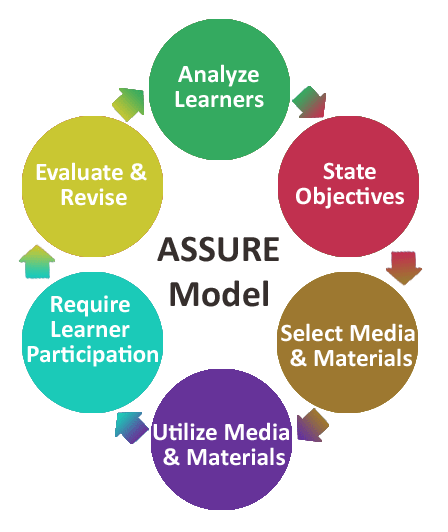
By taking a constructive approach, ASSURE model originally developed with an intention of helping teachers utilize technology and media in the classroom. It incorporates Robert Gagne’s events of instruction to assure effective use of media and technology in instruction. Because of ASSURE model’s emphasis on using educational technology in improving teaching and learning, it answers instructors questions such as why needs technology in content delivery or course assessment, what technology works best for a course context, and how to use technology in enhancing learning experience. ASSURE model relieves instructors pressure in selection of technology and tools, and helps instructors transition from “I am not sure” to “I know it works”.
Six tasks of ASSURE model:
ASSURE model includes six steps, or tasks, with each step describing a set of task aligned to selection and use of technology,
- Analyze learners: prerequisite skills or knowledge; learning styles, and motivations
- State objectives: A (Audience) B (Behavior) C (Condition) D (Degree) format
- Select, modify, or design methods, media and materials
- Utilize methods, media and materials
- Require learner participation
- Evaluate and revise
ASSURE model is good for enhancement with technology and media
With its great value in using technology in enhancing and improving teaching and learning, ASSURE model can be used to support online course enhancement which has a craving for technology integration in nature. Also, because ADDIE is based on the development of the instructional materials, while ASSURE allows for the fact that often-useful materials already exists that can be used as is, or slightly modified to accommodate the instruction, ASSURE model has its best-fit in enhancement not new development. By integrating a variety of assessment and content delivery methods through technology and media, an online course or training project could engage learners with incredible interaction and connection.
The following scenario uses an example to illustrate the process of using the six steps of ASSURE model to enhance an online course with each set of tasks demonstrated.
Scenario:
An online Biology Behavior course that has been developed two years ago needs to be enhanced with better communication and interaction solution. The instructor would like to update this course to meet new course objectives, attempt with available educational technologies and tools, and perhaps add new items including video lectures. An Instructional Designer will work with the instructor to go through the enhancement process guided by ASSURE model.
Enhancement through ASSURE Model:
Step 1: Analyze learners

The goal of enhancement is to inspire learners by providing them engaging learning experience, and knowing as much as possible about learners is critical to the entire process. So, the very first set of tasks in ASSURE model is to identify your audience in the following aspects:
- General characteristics,
- Such as age, gender, geography/location, accessibility needs, etc.
- What group do they belong to, students, teachers, etc.?
- Prerequisite skills or knowledge:
- what are the prerequisite courses prior to this one?
- what knowledge is assumed?
- Learning styles (https://www.learning-styles-online.com/overview/)
- Visual
- Aural
- Verbal
- Physical
- Logical
- Social
- Solitary
- Motivations:
- Why learners take this course?
- What are learners’ needs of taking this course? For degree, for training, etc.?
Because an enhancement is based upon a previous development, instructor would have a comparison between what he/she already achieved and what he/she want to accomplish. In addition to know the audience well, it is also the step for instructional designer to identify the instructor’s goal and expectations of the enhancement, and share an availability of educational technologies and tools, so that the ID can make proper suggestion and provide the best fit into context consultation.
Step 2: State Objectives

With the information of learners and instructor’s expectation of the enhancement, now instructor and instructional designer need to work collaboratively to write objectives to identify the intended outcomes or expectations, in other words, what the learner will do as a result of instruction. Please note that the focus of objectives is on learner not the instructor, which is one of the biggest differences from ADDIE model which focus on instruction more often. ASSURE model adopts an ABCD format in writing proper objectives, so that instructors understand what is supposed to happen in their instruction.
An example of writing objectives based upon the above scenario:
After watching an interactive lecture of biology behavior diagnose methods, BZ-3XX students will be able to produce their own biology behavior diagnose video for animal shelter at their own choice and post the videos in discussion board to receive at least 3 posts from peers, following the 5 criteria rubric.
The ABCD format is:
- Audience
- who your learners are? Please specify the learners for whom the objective is intended, such as “BZ-3XX” in the example.
- Behavior
- what behaviors to be demonstrated? Please specify what you want students to do by using action verb (observable and measurable), such as “produce a video”, “post videos in discussion board”, and “follow the rubric” in the example.
- Condition
- under what circumstances or conditions the behavior will be observed?
- Details of equipment, tools, aids, or references should also be included, such as “after watching lecture” and “receive posts from peers” in the example.
- Degree
- to which the learned skills are to be mastered? How well you want students to demonstrate their mastery, which could be but not limited to time limit, range of accuracy, proportion of correct responses, or any qualitative standards, such as “3 posts from peers” and “5 criteria rubric” in the example.
Step 3: Select Methods, Media and Materials
This is the step to decide what method and approach could be adopted to support the objectives, which include but not limited to video lectures, interactive lectures, online collaboration, group work, gamification-based activity. The instructional designer also brings the possibilities of technologies into the conversation; questions could be what technology might be involved, such as e-Learning software, video capturing tool, animation tool, filming equipment, etc., depending on discussed outcome in step 2.
It is also helpful to cope with some criteria in selection, which could be built around learners’ background, assumed knowledge, and instructor’s comfortableness of technology, as well as the availability of technology support. Sample criteria could include,
- be consistent with the students’ capabilities and learning styles
- best meet the learning outcomes
- be accurate and current
- be able to motivate and maintain interest. For instance, in this BZ course, a few drag-and-drop activities are planned to replace traditional multiple choice questions, which uses e-Learning software to motive learning.
- provide for learner participation. For instance, VoiceThread is selected to enable learners to participate with their own videos of animal behavior diagnosis.
- be with good technical quality. A steady performance should be considered when suggesting technologies, for instance, user friendly, easy navigation, and immediate tech support, should be discussed.
- has evidence of its effectiveness. For instance, the BZ course would like to enable students online collaboration, the instructional designer suggested both BigBlueButton and Zoom because of the successful experience from other online course feedback.
- free from objectionable bias and advertising
- include a user guide or other documentation included. Training, tutorials, and/or user handbook should be available for both instructor and students. If instructions were not obtainable from vendors, instructional designer should provide relative information before moving forward.
- FERPA compliant. Different universities have their specific FERPA compliance rules and data ownership policy. When selecting a tech tool, it is always helpful to check with instructional designer for institutional FERPA compliance for proper use.
Step 4: Utilize Media and Materials
Now it is time to detail how to implement the technology into course enhancement and help learners to meet objectives. Each type of media, material, and technology that have been selected should be prepared well in this step. Make sure each tool functions properly, and if possible, practice the tool as both instructor and learner. For instance, the BZ-3XXcourse selects BigBlueButton as its online collaboration and video conferencing tool for group discussion. The Instructional Designer provides training to the instructor on meeting management and recordings. The instructional Designer also tests as student to create and manage group meetings.
It is necessary and it is the instructional designer’s responsibility to well prepare both the learner and teacher for the learning experience.
Step 5: Require Learner Participation
As mentioned in Step 1, ASSURE model has its especial emphasis in utilizing technology in a course to enhance learners’ experience, in this Require Learner Participation step, instructor and instructional designer should describe how to get each learner “actively and individually involved in the lesson”. Be sure to incorporate questions and answers, discussions, group work, hands-on activities, and other ways of getting students actively involved in the learning of the content. Detailed information of learners performance should not only be included in each activity introduction, but also illustrated clearly in course syllabus.
For instance, the BZ-3XX course integrates drag-and-drop activity as part of assessment activities. The instructor needs to include the activity information in syllabus, activity introduction, and performance expectation. Within each activity, how students participate (such as drag items to relative boxes on the screen) and how they would receive feedback (such as instant feedback after submission) are also included in activity directions.
Step 6: Evaluate and Revise
This is the last step in ASSURE model, and it happens once the enhancement has been implemented and collects data/feedback regarding to the difficulties that may have been encountered during the instruction, from the beginning to the end. (This is totally different than ADDIE which conducts formative assessment throughout the required steps). So, it is the most important step in ASSURE model.
The evaluation should match the objective, and both learner performance and instructor performance should be evaluated. Typically, three questions need to be consider:
- Were the media, technology, tool, or materials effective?
- How to determine whether or not student met the objective?
- How to determine whether or not instructor performance was effective?
Survey questions or other data collection methods are usually applied after a conclusion to collect learners’ feedback and identify the effectiveness. Revise or re-examine is necessary if any issue was detected.
References:
The Instructional Design Models That Best Fit – ADDIE Model
Instructional design models “help instructional designers to make sense of abstract learning theory and enable real world application” (https://www.instructionaldesigncentral.com/instructionaldesignmodels), and there are many popular and well-known ones, such as ADDIE, ASSURE, DICK & CAREY, and SAM. So, which one would you pick?
It is obvious that each model has its features and always deserves a reason to appropriately support various instructional design services; there is not a model that is universal and will fit into all scenarios. This series of posts mainly discuss the best scenarios of each model through examples.
ADDIE Model: An “All-People-Know” Model
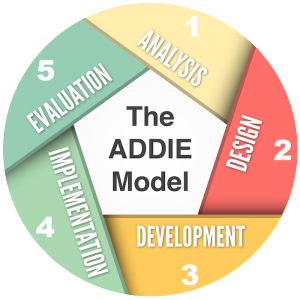
Any one in the field of instructional design or training that has not heard of ADDIE? Originated from the “Five Step Approach” which had been developed by the U.S. Air Force in 1970s, ADDIE model probably is the most famous and earliest instructional design models that has been widely adopted in training and course design till today. Most ID models are the variations of ADDIE (https://educationaltechnology.net/the-addie-model-instructional-design/).
Although people think ADDIE model is outdated today due to its hierarchical structure which means that one had to complete the process in a linear way, ADDIE is still the most commonly used in instructional design, especially for new development (https://educationaltechnology.net/the-addie-model-instructional-design/).
Five components of ADDIE
Analysis, Design, Development, Implementation, and Evaluation are the five phases of the model, which have been introduced many times with details in others’ posts. So to give a quick summary here,
- Analysis sets up the goal of a project,
- Design starts the preparation and collection of materials and content,
- Development builds the project with information from Analysis phase and materials from Design phase and also begins the first stage testing as the progress goes,
- Implementation continues the progress and modification of the development, and
- Evaluation holds the responsibility of final testing of the entire project.
ADDIE is perfect for new development
Because of its linear structure, ADDIE model is easy to learn and perfect for new development/project, especially for those under certain established standards. Below is a scenario of the application of ADDIE into an individual online course development.
Scenario:
Department A in University B is going to develop its third online course of the C program. There is already a generic course template that has been created for the C program. The instructor will work together with an ID to develop the course.
Development through ADDIE Model:
Step 1: Conduct needs analysis of the course
In this very first step, with the purpose of acquiring course related information and establishing a proper tone of the development. the ID guides the instructor to share and explore the context of the course by exchanging of questions which include but not limited to:
- What is the course role in the program?
- Has this course been offered before, online or face-to-face?
- What might be the enrollment? – (useful for possible group projects)
- What is the background of students, in terms of demographics, previous experiences, diversity, learning ability, interests, etc.
- What will be required in terms of prerequisite, skills, technologies, intelligence, knowledge, action, lab if applicable?
- What are the course learning objectives? Program objectives?
- What do the students need to accomplish at the end of the course/program
- What are the student’s needs?
- What materials does the instructor already have, such as syllabus, class schedule, lecture, assessment ideas, etc?
- What needs to be developed?
- What needs to be improved?
- How comfortable the instructor deals with technology and LMS?
- Has the instructor taught online before?
- Has the instructor been familiar with any educational technologies/tools?
- What is the instructor’s expectation of developing the course?
- What is the instructor’s expectation of working with an ID?
- What might be the limitations of the course development, such as technical, time, other support?
 Step 2: Plan on needed courses items
The second step maps the whole course structure and identifies the items for each learning unit. Following the program template, the ID uses storyboard, mind-map tool, and course rubric (if there is any) to draft and structure the course with the instructor. Items that need to be planned in this step include but not limited to:
- Teaching style
- Behaviorist
- Constructivist
- Active learning approach
- Communication methods with students
- Virtual/ office hours
- Communication through LMS
- Feedback mechanism
- synchronous
- asynchronous
- The numbers of learning unit.
- For most spring and fall semester courses (16-week), there should be 16 learning units/modules; for summer courses (8-week), it usually has 8 learning units/modules.
- A similar and logical structure for each learning unit
- Different types of media to be used
- Audio
- Video, Images
- Animation
- Learning resources
- Textbooks
- Articles
- Websites
- Software
- Others
- Items for each learning unit –
- Learning unit objective
- Learning unit overview
- Unit lecture (select the best method of lecture delivery)
- PPT slides lecture
- Screen-capture lecture
- Video lecture
- Others
- Unit activity
- Unit assessment – A combination would work better
- Quiz
- Discussion
- Assignment
- Group project
- Others
- Time frame for each activity, learning object, assessment, project, etc.
- Course evaluation
- Survey
 Step 3: Produce planned items
With well-planned course structure, it is the time for ID to work independently (with continuous communication with instructor when necessary) to create those learning objects and test learning outcomes. This is also the step that requires the ID to have a wide range of skills and knowledge in not only instructional design but also educational technology. While working with technology software/tools to create planned items, the ID also need to take the following questions into consideration:
- Are there any additional materials needed as the development goes, but was not included in previous planning?
- Is the time frame being adhered to original timeline?
- Is this any difficulty that might delay the process?
- Is there any external resources or support needed to accomplish the original goal?
The software and tools that an ID might need to work with include
- LMS
- Blackboard
- Canvas
- D2L
- Moodle
- Audio editing tools
- Audacity
- Adobe Audition
- Video editing tools
- Adobe Premier
- iMovie
- FinalCut
- e-Learning software/Other software
- Adobe Character Animator
- Adobe Captivate
- Articulate Storyline
 Step 4: Get items into place in LMS
After a couple of weeks or even months of development, all items are ready to be in place. In this step, the ID endeavors to deliver the course effectively by updating, editing, and organizing well-prepared items in LMS accordingly. It is also important to exam a few questions before course delivery:
- Is there any preparation of Plan-B, especially with technology tools, if anything wrong happens? For instance, a tool might not work well with students.
- Is there any training of educational tech tools, LMS, or any other technology needed?
- Who would be responsible for support during the live course?
- What would be the ID’s role after course delivery?
- What is the storage of course materials after course delivery?
If conditions permit, a course review is strongly recommended in this step as well. Share the developed course with another ID or invite external participants to go through the content and each learning unit as a test student, which would help to receive feedback and suggestions from bystander and test the course from student’s perspective.
 Step 5: Exam the success of the course
This last step of the course development is to test what, how, why, and when of the items that were accomplished or not accomplished of the entire project. And this evaluation is summative to ascertain whether all problems are solved and all desired objectives are met. To be specific, the aims of this evaluation phase in ADDIE is to determine
- the way to know whether the instructions are clear or not,
- the way to know whether the assessment activities and assignments are effective and efficiency in examine learning outcomes
- the way to know whether the time-frames work for students or not
- a system for collecting and analyzing participant feedback
- who receives the final output
- the next step after evaluation
So, guided by the five phases, the ID and the instructor collaboratively accomplish their course development. If there is any issues or concerns (usually not on the technical side) appeared in the evaluation phase, the ID could either return to the Analysis phase of ADDIE to figure out the solution, or try with another instructional design model that works better for enhancement and improvement, ASSURE model.
5 Video Conferencing and Video Assessment Tools That You May Consider for an Online Course
If you had ever taken an online course, one big challenge might be less participation in synchronous-type activities with instructor and peers, compared to a classroom course. While enjoying the flexibility and self-paced learning that provided by online education, it seems that online learners sacrifice their direct and immediate communication with teachers and classmates, at least to a certain degree.
But, is that true?
With advanced video conferencing tool and video assessment tool, online learners receive the same (and even beyond) amount of synchronous communication as they have in a classroom; and possibly, they interact with instructor and peers in a more frequent and diverse way. This post introduces 5 different video conferencing and assessment tools that can bright your online course, in terms of communication, collobration, and assessment.
(Please check the document for a complete comparison matrix: Video Conferencing Tool and Video Assessment Tool
1. Zoom (https://zoom.us/)
![]() Zoom is a video communication tool, with an easy, reliable cloud platform for video and audio conferencing, chat, and webinars. It supports synchronous online conference for online course.
Zoom is a video communication tool, with an easy, reliable cloud platform for video and audio conferencing, chat, and webinars. It supports synchronous online conference for online course.
By integrating Zoom into online course, instructor can schedule online meetings with students, provide virtual office hours, encourage students online presentation, offer live tutoring, etc. In addition to meeting with the whole class, Zoom allows breakout rooms with fixed scheduling. So if you are looking for integrating group activity into online course (which is commonly designed and used in language classes and social working classes), such as live group discussion, student-drive conversation, and role-play scenarios, it is easy to engage students with Zoom group discussion.
Because Zoom is not designed as an assessment tool in nature, it won’t assist with formal grading or evaluation feedback within a LMS grade-book; but all feedback to students would be immediately delivered during conferencing, which is the same way as students receive comments from instructors and peers in traditional classroom.
2. BigBlueButton (https://bigbluebutton.org/)
![]()
BigBlueButton is an open source web conferencing system, and has been adapted by several learning management systems (LMS) as branded online communication tool. Canvas by Instructure is one of the LMSs that has integrated BigBlueButton as its online conferencing tool (https://community.canvaslms.com/docs/DOC-10738). If an institution has limited budget to expand technology tools in online course, but would still be interested in bringing synchronous activities to online learners, BigBlueButton would be a good option.
Similar to Zoom, BigBlueButton supports synchronous activities, such as online meeting, conferencing, webinar, chat, presentation, virtual office hours, etc. Within an LMS, BigBlueButton allows selection of course members in participation of an online meeting/conference, which enables instructor easily creates and manages group activities and in-class live discussion. Moreover, instructors can provide students direct and immediate feedback during conferencing, and stay connected with each other through the whole session.
3. VoiceThread (https://voicethread.com/)
![]()
VoiceThread summaries itself as, “Transforming media into collaborative spaces with video, voice, and text commenting”. As one of the few available video assessment tools in the market, especially after Zaption and Office Mix were gone, VoiceThread takes its unique position in online education.
Although VoiceThread is not a video conferencing tool, but with scripts it has the ability to create a sense of synchronization, which has been successfully used in language practicing activities.
Because of its assessment nature, VoiceThread integrates grade-books with LMSs, and notifies students to keep connected. In addition, VoiceThread allows students to playback their video and audio threads before sharing, which gives students great opportunities to modify and be confident with their learning performance.
4. PlayPosit (https://learn.playposit.com/learn/)
![]()
PlayPosit is a video assessment tool that supports evaluation during lecture playing. It allows questions to be inserted into a lecture, and pauses the video until online learners share their thoughts.
PlayPosit has the integration ability with most of the LMSs, which provides an option for online content presentation and assessment. It fills the gap between lecture and students engagement, and allows instructors to receive immediate data of learning. Similar to VoiceThread, Playposit supports in turning passive lecture watching into active learning in online education, and it does and will continue help online learners and educators to track the learning progress without monitoring.
5. YouSeeU (https://www.youseeu.com/)
![]()
YouSeeU was launched in 2009 with the objective of solving problems in distance education and improving the student experience through video. It experienced some big changes in the software interface, and now named BONGO as its new video assessment ans soft skill development platform.
As one of the leading video assessment tool, YSU provides several options for online learners, such as individual activity, group activity, synchronous activity, which has been widely used in language learning and social communication skill courses. Online learners have the opportunity to provide instant feedback to students, and comment to submission through either text or audio/video. YSU also has the ability of integrating grade-book within LMS, which is convenient for learning performance tracking and progress monitoring.
Some institutions would also have a combined adoption of the above tools for providing online learners a more convenient and flexible distance education environment.
5 Different Ways of Using Discussion in Canvas
Like most other learning management system (LMS), Canvas possess the function of Discussion, which allows both instructors and students to contribute to “as many discussion topics as desired”, either “focused or threaded” (https://community.canvaslms.com/docs/DOC-10727-67952724152).
Typically, Discussion is used as discussion board or forum of sharing thoughts and communicating on questions. It can also be used for resources sharing, solution exploration, feedback collection, etc. In this post, the author is going to share five other ways that you may want to try with Discussion.
- Use Discussion as Communication Station

In traditional face-to-face classroom, it is very easy for students to interact with each other and the instructor on certain topic or questions midst teaching and learning, by simply raising hands or talking. To maintain the same or even higher level of interaction in online education environment, turning rigid discussion board into a flexible Communication Station will sufficiently fulfill the need of communication and idea exchange in general.
With simple instruction or guideline of this discussion-featured Communication Station, students can ask questions in general or specific, such as an unclear statement in syllabus, questions of assignment submission, favorite topics or lectures, etc., and answer questions for peers, which not only creates an authentic “classroom” atmosphere, becomes familiar with peers, but also enables instructors to aware students’ concerns and expectations of course materials.
2. Use Discussion as an On-site Assessment Tool
Remember what we usually do at the very beginning in a traditional RI (Residential Instruction) course? Say Hi to each other, and introduce ourselves, right? Many instructors thought it would be hard to integrate the same type of warm-up activity into an online course, but they did not know that with Discussion, it would be super easy and simple, and even with more interaction and fun!
For instance, propose at least three questions that students might want to know from each other (and course related), such as background, favorite sports, expectation of a course; or ask students to enter two truthful statements and one falsehood about themselves, and let others to distinguish the truths from the lie. Instructor might also want to consider post his/her reply as an example and let students know their instructor first.
By using discussion as on-site assessment tool, instructor and students obtain the opportunity to know each other (even with useful data if questions could be nicely designed) and build their own community before learning happens.
3. Use Discussion as a Journal Creator
“Journals” is a great feature in Blackboard (https://help.blackboard.com/Learn/Instructor/Interact/Journals), but not a Canvas-owned function in nature. When institutions transited from Blackboard to Canvas, instructors who were journal-users feel struggled. But actually, Discussion in Canvas can serve as “Journal”, if with designed instructions and proper settings.
Canvas Discussion can fulfill the Journal needs especially for group project and course-related materials discussion and analysis. For instance, instructor can assign topics for different groups to record their learning journey across learning units/modules, so that members of a group can view and comment on each other’s entries, where all members can benefit. Instructor can also ask students’ opinions on a certain topic across the whole course so that students will record and build their ideas.
4. Use Discussion as an Reflection Tool
Reflection and self-reflection is considerable in online courses, especially for a course that requires critical thinking skill. After being presented rich course content, students need a moment to reflect their own learning journey, such as what has been learnt, what has been questioned, what could be improved, etc.
Using Discussion as a reflection tool, usually in the middle or at the end of an online course, serves as the “moment” of reviewing the entire learning process and reflecting of gains, losses, and improvements.
To receive the maximum participation and guarantee most benefit for students, instructor might want to align discussion questions with course learning objectives, and include clear guidelines and rubric for students to reflect and self-reflect.
5. Use Discussion as a Mediation Tool 
Use Discussion as a mediation tool might be limited to some subjects. For instance, social-work courses usually require the skills and techniques of mediation. Assignments in those courses are often designed to evaluate students’ mediation performance by role play.
Discussion in Canvas allows students to sign-up group, upload videos, and record learning process (threaded posts), which is suitable for role play in mediation. For instance, instructor creates different discussion groups, assigning members randomly or self sign-up, then ask groups to showcase their projects by integrating other video conferencing tool to record the whole process. For each individual group, instructor can facilitate discussions to provide suggestions or feedback.
Hope the above five ways of using Discussion differently will help your course with more interaction and fun!
